Monday 29 December 2014

Marshmallows

Last night's (and this morning's) project was...marshmallows

Friends have been posting the link to a marshmallow recipe and talking about how home made marshmallows are better than the ones from the store, so I thought I'd try it.

This is the recipe (Alton Brown usually has good recipes)
http://www.foodnetwork.com/recipes/alton-brown/homemade-marshmallows-recipe.html

I thought I'd taken pictures of the marshmallows last night after I piped them out, but I don't see it so I must not have. I've been having problems with the camera on my phone.

The recipe was easy to follow and seems to have worked. Piping them out was a mess. The first bag full was fine, but it got sticky from there. Perhaps next time putting it into a ziplock where more will fit or I can use a second would be better. The piping is my main complaint about this recipe. I know I could have spread them in a pan and cut them later, but I wanted to try mini-marshmallows.

The other thing I tried was making shaped marshmallows. This mostly didn't work. I have silicone molds that I sprayed and dusted with the corn starch and confectioners sugar, but between the mix clumping and distorting the marshmallows and not completely coating the mold so that the marshmallow stuck in places, most of the molded marshmallows failed rather miserably.


The top are the piped and cut marshmallows. Across the bottom are gingerbread man, snowman, owl, a couple hearts, another gingerbread man and a cat. 

The marshmallows taste good. I had food coloring so I added a bit of purple, so the marshmallows are purple. Are they worth the work, perhaps. 


Sunday 26 October 2014

Fall means applesauce

Last year was my first year making applesauce. My older daughter, Valerie, would specify "applesauce that  you made" so she would get mine rather than store bought. My younger daughter is somewhat indifferent. If I send applesauce in her lunch, she'll eat a few bites, but that's about it. Valerie will eat the better part of a pint if I let her.

Last year I bought apples from a local farm that we picked ourselves. It was rather expensive. I also bought some at the local grocery store for $0.59 a pound. It was a bit sad that I could buy them at the grocery store for less than what we paid to go pick them. Mainly I wanted to give my girls the experience of picking apples.

Valerie wanted to pick apples again this year so we picked a half bushel (for $17).
I knew I wanted more apples than that but a coworker had let me know about another farm where I could buy seconds (perfectly good apples for applesauce, but not perfect apples) for $16 a bushel. I think I ended up with two bushels. I ended up with a half bushel each of Liberty, Empire, Gala and honey crisp, I believe. I also bought some at the grocery store for $0.54 a pound. Those were Macs, Jonagold and Jonamac and probably a few others as the girls were randomly picking out apples. I do like that all the apples I used last year and this year were all Michigan apples. Michigan sure has tasty apples.

This year I invested in an apple peeler. I always doubted how useful they would be, but I saw the error of my ways this year. My girls were able to help me peal and with me putting the apple on the pealed and taking the core off. Cordelia could peal 3 in the time it took me to do one. I stopped pealing apples with a knife. Even when the girls weren't helping, I used the apple peeler. All I had to do was break up the spiral sliced apple in the pot, which was easy.

I have apples to make one more batch of applesauce, but I don't think I'm going to can it. I canned probably 27 quarts of applesauce this year. That's quite a bit more than last year.  Last year I put it all in pints and half pints. That was a mistake. The girls could easily polish off most of a pint, so the half pints were a single snack and hardly that. This year I put quite a bit in quarts, but I also did some pints. I ended up with a couple half pints as well because I had more applesauce than clean jars on the last batch.

My recipe for applesauce:

As many peeled, cored, and sliced apples as will fit in my pot. It's big but not huge.
A half cup of sugar, mainly to keep the first ones in the pot from turning too brown while I was peeling the rest. I ended up with about 4 quarts of applesauce, so that isn't much added sugar per serving. Did it work? Who knows.
Cinnamon to taste. This is usually a fair amount. I add some then stir and taste. I like my applesauce cinnamony.

I cook it until it looks like quite lumpy applesauce. I use a potato masher to break up the pieces to be a bit more bite size. Some people will purée it, but I like my applesauce lumpy.

I put it in the clean jars, lid them and then process them in a water bath. I do 15 minutes in the water bath for all sizes as I'm hot packing and usually have a couple different sizes in the bath and figure that a bit of extra time won't hurt.

I also tried a batch of apple butter this year. I made it like my applesauce, but I puréed it, added cloves and nutmeg and simmered it for a long time.

The applesauce puréed to be made into apple butter.
The apple butter ready to be put in jars.


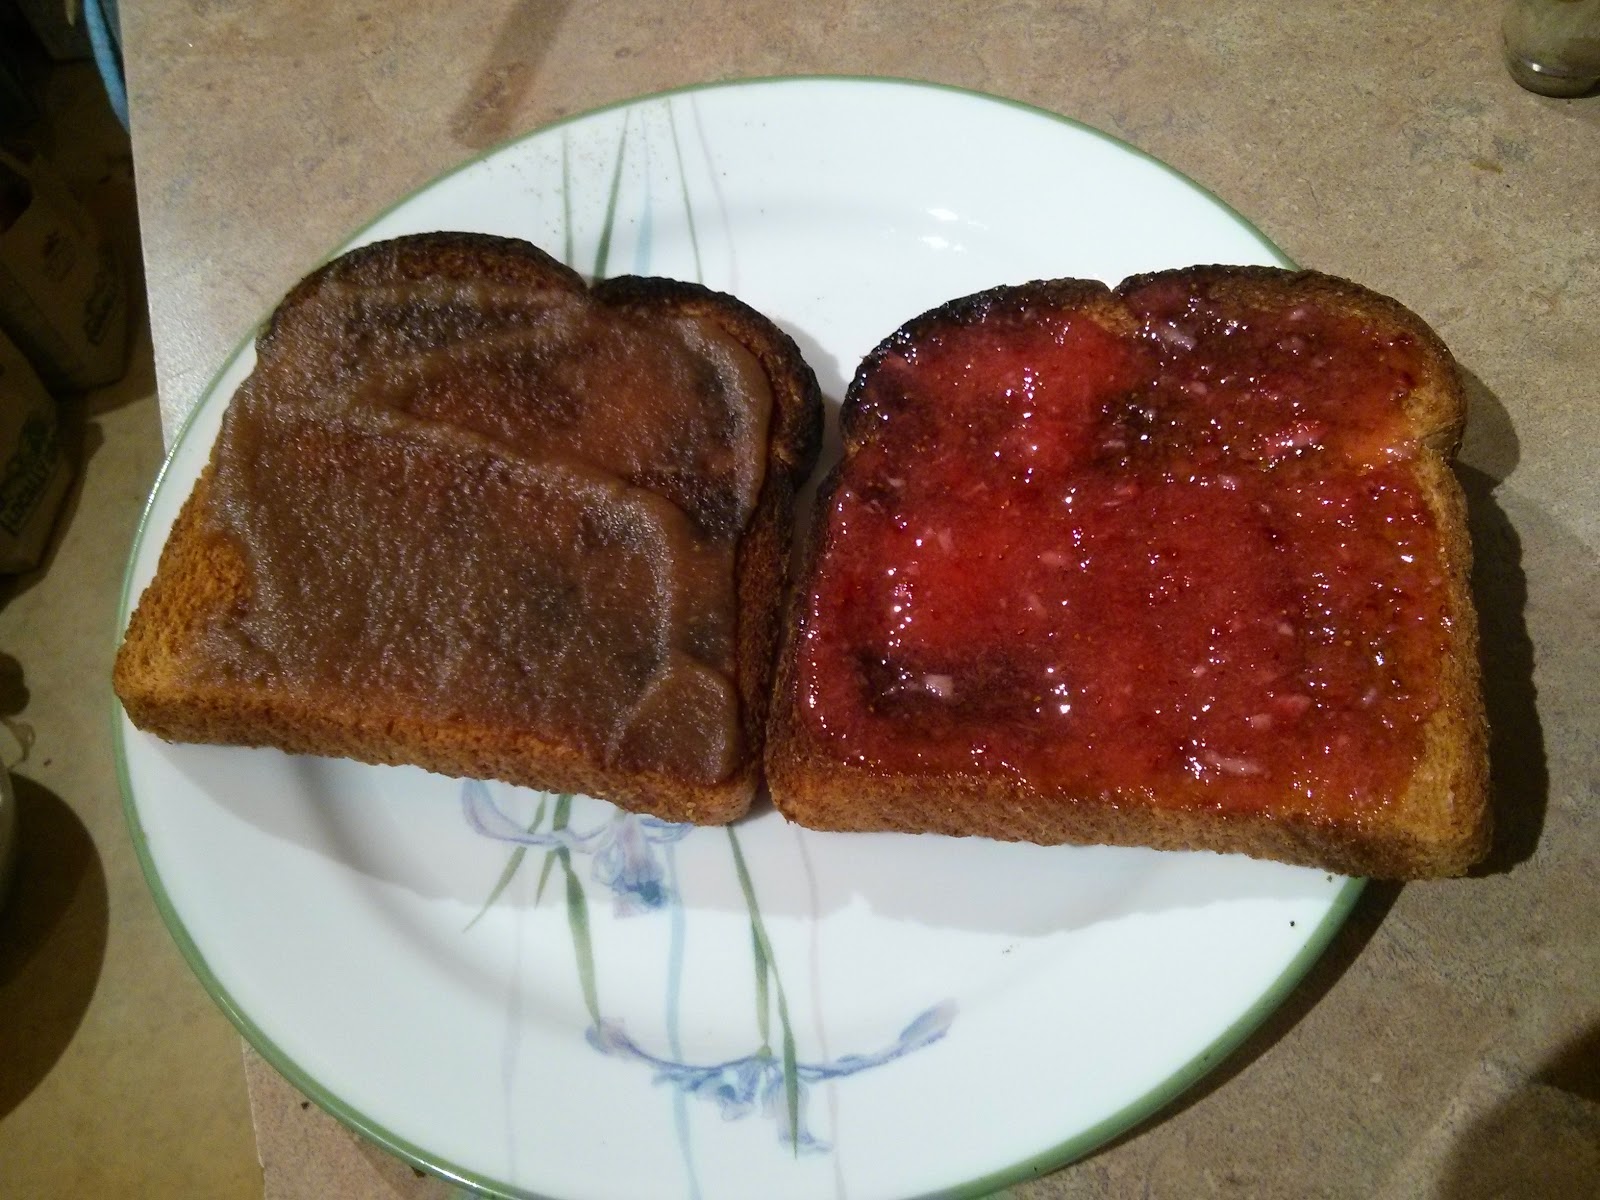
Here it is on toast. It was quite tasty, but I do not believe it will become a favorite of mine on toast though. The slice on the right has strawberry freezer jam on it. That is my favorite.


Our house was built in 1928. It has a pantry built under the stairs in the basement. I love putting stuff I've canned in that pantry. Right now it has a fair amount of applesauce, mulberry jam, blueberry jam, peach jam, apple butter, and maple syrup in it, along with some store bought stuff. This makes me a happy Michelle

The final product. Apple butter in the half pints. Applesauce in the pints and quart.

Friday 10 October 2014

New toys

My new toys arrived today:
My husband declared them to be "terrifying".

As I mentioned in my last post, I had purchased a raw fleece. It was this gorgeous brown. I started combing it.

This past weekend at a crafting weekend, which will need its own post, we did a bit of dyeing. I threw some of this fiber in the dye pot after the original fiber was taken out. It turned a beautiful, rich purplish brown.
The top two locks are undyed. The bottom are dyed. I wanted more of this color...although the picture doesn't do it justice. 

The dye is Wilton icing colors. The nice thing about using this as a dye is that it is (obviously) food safe, so I didn't need to worry about what pot to use. 
The down side to this dye, as we found out later, is that it breaks easily. By "breaks", I mean it breaks down into the component dyes. The original ball of yarn has red on the outside and blue on the inside because the blue traveled farther. 

The fabulous part was what it did to this skein and to some fiber that Carol threw in the pot with my fiber. 

The fiber on the right is undyed...in case you couldn't guess. The tips caught the purple/blue where the rest ended up a fabulous pink.

With these results I wanted to try to get more of the purple. I bought some dye of my own and put it all (one container of dye) in my large pot I use for water bath canning and let it heat up. I added as much fiber that would fit reasonably in the water and let it sit for a half hour. I rinsed the fiber and refilled the pot with more fiber as there was still color in the pot. The first batch of fiber came out a nice purplish for the most part, as expected.

I was a bit...surprised by the result.

The farther table has the fiber from the first batch of dyeing. The closer table has the second batch of fiber. It's...green. 

I guess what happened is that the first batch took up all the red/blue and what was left was green. According to a friend, certain dyes are notorious for breaking. Dyes that contain Red dye #3, like this violet dye, tend to break. 

I've combed some of the green dyed fiber and it is less green after dyeing. The tips seem to have most of the color and they come out in the waste. 

The interesting thing about dyeing this fiber is that it seems to be softer after dyeing. Now that I have my new toys, I'll continue combing and see what I end up with. It could be an interesting hat as now it seems like it might be soft enough. I look forward to spinning this, but I haven't done any yet. 

Working with this fleece has made me want to process another raw fleece. I think what I might do with the rest of this is try dyeing it with kool aid. I will try a small batch and see how it turns out. I think the purple over the brown is beautiful and the kool aid allows me to do it in my kitchen without worrying about toxicity. This fleece may end up being about playing with overdyeing the brown. If I like the kool aid purple enough, I may do the rest of it like that and make something larger. Carol also mentioned that it could be used for striping with another color...or the natural fiber. 

In two weeks is another local fiber expo. I think I'll go solely for looking for another fleece or two to process. I didn't think I'd like this so much. 

I had been using a couple combs that I bought at Meijer. At the craft weekend, I got my hands on some proper wool combs. They were so much better than the hair combs. After using them a few times, I decided I needed my own set. 

This post got a bit side tracked. I think I'll try another post about combing. I'll have to get some pictures of the process.

Monday 22 September 2014

Wool

So...this weekend was the local(ish) fiber sale.

Here is most of my haul:
The haul

This is all for needle felting. The white is for bases. It's less expensive than colors. I figured the browns will be good for animals and I'm doing Toothless, so I need black. The orange on the bottom is for pumpkins. The rainbow will be for various projects. I saw these colors and couldn't help it. I found a tutorial for felted bracelets with a knitted base and needle felted design and thought that the girls would like one with a rainbow on it.

I also bought a 32" size 4 needle as they don't seem to be easy to find in wood. The price was reasonable.

Here is the one last thing I bought:

Wet fleece
Fleece info. 
That is most of a 6.25 pound fleece that I bought. It is Border Leicester, which has a long staple and a nice crimp. The tips are bleached and overall it is a gorgeous color.
I learned something important today. If I want the wool to dry outside, I need to start washing before 2 pm (the morning was busy today) as I didn't get it outside until almost 5. It didn't dry all that much.

Cordelia checking the wool
I moved it to my craft room in the basement. That's where I took the above picture. Not included in the picture is the first batch of wool that I washed on Saturday in my small utility sink. The fleece on the floor was washed on Sunday and is mostly dry.
When the wool was on the back porch, it looked like a sheep had exploded on the porch.

Thankfully the craft room is where the dehumidifier is located. I turned it up to max so hopefully it won't take the wool too long to dry. I won't be able to put it back outside as I have to work the rest of the week. I'll go down tomorrow and turn it.

I started combing the first batch. It matted a bit. I tried to be careful with it, Perhaps this amount of matting is normal. I think it's combing reasonably.

Ready to comb
I don't have wool combs, but I was told that I could use wide tooth combs. I found these combs at Meijer. They have two rows of teeth just like the wool combs and seem to be doing OK. I've only done a small amount. I won't mind doing it, but it will definitely take time.

Combed wool

 The bottom bit is fresh off of the combs. The top was rolled into a little "nest"


"Waste"
I was surprised by the amount of waste, but I do think that I was better at minimizing this with the later combings, so perhaps it won't be too bad. This "waste" can be used for stuffing and needle felting, so it won't really go to waste. I am curious, though, to see what percentage the waste will be. I plan to weigh the combed wool and waste when I'm finished. I didn't weigh the wool as it came so I'll have to trust what it said on the label for a starting weight.

Wednesday 23 July 2014

Jacket

I really need to get a different picture of this. I am wearing shorts. It just doesn't look like it.

The pattern is Jacket with cables and garter stitch in "Eskimo" by DROPS

http://www.ravelry.com/patterns/library/117-51-jacket-with-cables-and-garter-st-in-eskimo

This is the second DROPS design I've done. I like both of them. The first ended up too long, but I still like it. The second, since it seemed like it was going to be too long again, I shortened by over 2 inches. It still turned out kind of long. I suppose it is supposed to be long since it's supposed to be a jacket.

It is made with bulky yarn. I used Lambs Pride Superwash bulky in Bayou Blue I had purchased from Little Knits a short while ago. I knew I wanted to do a cardigan in bulky yarn, but didn't have a specific pattern in mind when I bought this yarn. I did a test gauge piece on size 10 needles (12 stitches over 4 inches) and size 11 needles (10.5 stitches). The pattern calls for 11 stitches over 4 inches, so I used the size 11.

I started this sweater June 20th on the train to Chicago for a meeting for work. I finished it July 20th. That's when I assembled it. I had finished knitting it several days before and it took a couple days to get around to blocking it and 3-4 days to get it to dry completely after blocking.

This was the first time I tried blocking a sweater in my craft room. The room is in the basement, but there is a dehumidifier in there. I don't know if it was the weight of the yarn or the location that made it take so long.  It looked massive all laid out on the floor (before assembly) but it seems like it fits nicely.

Sunday 20 July 2014

Laundry detergent

Early last fall, I made my own laundry detergent following a recipe that I can't seem to find again. It called for Fels-naphtha bars, borax, washing soda, oxyclean and crystal fabric softener.
A friend told me that she just uses the naphtha, soda and borax, but by then I had already made it.

For the most part I've liked the laundry detergent, but I didn't like the fabric softener in it. I could hardly go in my laundry room because it smelled so strong.

Last weekend I ran out of the detergent so I made some more. Earlier in the week, my daughters and I grated two bars of Fels-naptha. 
Today I found this website http://www.reallyareyouserious.com/2011/01/easy-homemade-laundry-detergent-powder.html

The detergent has 3 ingredients, the naphtha, borax and washing soda. I have young children, so I like the idea of adding the oxyclean. I had purchased some inexpensively at the local dollar store.

My measurements are rough, but since I had 2 bars of soap, I used 2 cups each of the borax and soda. I used one of the (16 fluid oz) containers of oxyclean and mixed it in a bucket.

I'm curious to see how this goes without the fabric softener in it. I do have wool dryer balls to use in the dryer. I've been using them on and off without really noticing a difference, but the clothes had already been treated with fabric softener.

Overall, I like this detergent, even though I recently heard a relative scoff about someone they knew who made their own detergent. I can't explain exactly why I wanted to do it. I like the idea of making my own stuff to use around the house. Some say they want to get away from the chemicals. Well, I hate to break it to them, but all the stuff in these are chemicals anyway. Some make their own detergent to save money. I've not done the math, but I wouldn't be surprised if making it this way saves money.

When I was buying oxyclean proper, it says to fill the washer, add the oxyclean and then add the clothes. I assume they say to do it this way so that, at higher concentrations when the water first hits it, it doesn't hurt your clothes. I'd like to be able to just put the clothes in the washer, add the detergent and be done, but for now, I've been adding the clothes after the detergent after the washer has filled. Perhaps when the girls get older, I'll skip adding the oxyclean. As it is, I have enough for a couple more batches of detergent. Perhaps I'll try it without when I run out.

Friday 18 July 2014

And yet more jam

I counted jars of jam a couple days ago. There are 28 pints of mulberry jam in the pantry. That doesn't include the one we've been using and the 4+ I've given away. Some of that will go to my Mom and sister. Some will be given as gifts. The rest means I won't have to buy jam... like ever.

I wasn't all that thrilled with the peach preserves I made the first time around. I tried canning some peaches following this recipe: http://www.pickyourown.org/peachescanning.htm

I think the method is probably sound, but I think my peaches will be kind of mushy. We haven't eaten any yet. A problem with canning peaches is that you buy them when they're rock hard. They stay rather rock hard and start to go moldy/mushy while the inside is still not really ripe.

I was pretty happy with the next batch of peaches I bought. They seemed to actually ripen and hadn't gone moldy. This time I tried  freezer jam. Yummy! I used this recipe: http://southernbite.com/2014/06/25/peach-freezer-jam/

I'll admit that I kind of wanted to sit and eat it all right after it was finished. I have tried some after freezing and wow, does it freeze hard. I'm used to strawberry freezer jam where it remains kind of spreadable. The peach was not. I'd take it out and leave it in the fridge to use, but I'm trying not to eat it all in a short period of time. Making jam wasn't the best idea for my diet.

Kroger had some very yummy blueberries for a decent price a short while ago, so I went back to get more and got enough for us to make a batch of jam and some to eat with half and half. I used this recipe (but I forgot to buy a lemon for zest): http://www.tasteofhome.com/recipes/canned-blueberry-jam
I'm not sure I'd add the cinnamon and nutmeg next time. It does kind of taste like blueberry pie though, which isn't a bad thing. I wasn't sure this was going to set as it seemed to take much longer than the other jams I had made. We haven't tasted it since it set (at least I think it set), so I'm not sure what it is going to be like.

I think I have enough jam. The mulberry trees are still going strong, so I may pick a few more times to have lots to give away. It seems to be a hit with those we have given it to.

Tuesday 8 July 2014

More jam

I've been making lots of jam these days. I think I've made 5 batches of mulberry jam, 2 batches of strawberry jam and, most recently, a batch of peach preserves. I've already talked about the mulberry jam. Both yesterday and today I picked enough mulberries for about 2 batches of jam each day. I washed them and put them in the freezer.

My Mom gave me a couple small containers of strawberry freezer jam that my sister made. The jam was so good! The following weekend, I bought strawberries at Costco. They turned out to be not quite as nice as the ones I had been buying there, so I decided to make jam. I much prefer strawberry freezer jam to that which had been canned. It tastes so much more like strawberries spread on the toast.

The recipe I used was this one:  http://allrecipes.com/Recipe/Strawberry-Freezer-Jam/

I'd make it again.

Last weekend I bought 12 peaches as per this recipe:  http://allrecipes.com/Recipe/Peach-Preserves/

They were quite hard yet, so I let them sit. They were rock hard for a couple days, then the following day they were starting to get moldy. I cut the moldy parts off and used them anyway. I ended up using a couple more that I had bought a couple days later that were still kind of hard. I think the recipe is decent, but I didn't have the best fruit to work with. It is tasty, but I think it could be better.

For pints of peach preserves (there was a bit more, but I put it in a small container in the freezer as there wasn't enough for a full pint) and some mulberry jam.

Saturday 28 June 2014

Mulberry jam

This spring, I discovered that I have at least 5 mulberry trees in my yard. I never really knew what mulberries were and basically only knew them from the children's tune. As I've been discovering what is growing in our new yard, I learned that those berries on those trees are mulberry.

I did try a couple fresh from the tree, but I wasn't all that excited. Recently, I've heard from friends that they've made mulberry jam. I figured, what the heck, I might as well try that.

I've been collecting mulberries over the last week or so (with several days being away from work). I figured today I had enough berries so I gave it a shot. It turns out that I probably have enough for another batch in my freezer.

Today I collected over 3 cups of berries. I've only been half heartedly collecting them. I pick what I can reach and am not really worried about getting them all. I've heard of shaking the trees with sheets under the trees to catch the berries, but that seems very wasteful. Less than half of what falls is ripe.

Today's collection of just over 3 cups of mulberries.


My friends told me that they didn't take the stems off of the berries. I'm glad to hear that as it doesn't seem easy. I put the berries in the food processor and the stems basically disappear. From the more than 3 cups of berries, I got about 1.5 cups of berry purée.

I followed this recipe: http://thedirtyradish.blogspot.com/2011/06/recipe-mulberry-jam.html

It was very easy, which is good as this was my first attempt at jam.

My setup. The canning bath on the left. The berries cooking (before sugar added) on the right and the small pan with the lids for the jars warming.
 
 
The jam in jars


One of the nice bits about the "skim off foam" part was that it gives you the opportunity to taste the jam. It was quite good!

I have enough for another batch, which I'll definitely be doing once I buy more sugar (6 cups of sugar in a batch!) and pectin. There are still lots of berries in the tree that have yet to ripen, so I'll be picking more. I need to see if the girls like it. If they do, I'll be using this for their PB&Js. I will look to see if I can find other recipes that call for less sugar.  If I do, I'll try that and see how it tastes.

Friday 6 June 2014

Michelle makes a sweater

I finished spinning the first 8 oz of orange yarn.
It makes a pretty single.


I 2 plied and Navajo (3) plied a bit so I could figure out the wraps per inch. I came up with 12.3 wpi for the 3 ply and 14 wpi for the 2 ply. The 3 ply is a better size, I think and frankly it looks better.


I've started 3 plying (not Navajo) the orange. Sadly my bobbins for my wheel aren't all that big. I fit just over 8 oz on 3 bobbins. That means I'll need 3 bobbins to get it all plied... or ply it a bobbin at a time so I can then get it off of the bobbin so I can do more. ETA, I have now filled the bobbin twice with plied yarn.

In garden news, I emailed my Father-in-law asking about a saw for cutting branches high. He called me back and ended up coming over on Sunday and we cut back a couple lilacs, a burning bush and piled it all in the thistle garden in the front yard. It will take a couple months to get it all to fit in the bins for the city to collect.

Lilac before.
Lilac after.


I still need to cut back the spirea. There is the one large one in the back corner of the yard. I also found that there are about 4 others that were planted either side of the two lilacs that are along the back fence. They were quite shaded by the lilacs and other bushes in the back. The lilacs haven't been cut back in a long time. My FIL commented that he hadn't seen a burning bush as large as the one in our back yard. I cut that back because it was shading another lilac. I may cut it back more, but my main goal was to get it away from the lilac some.

That same lilac has a mulberry tree growing amongst it. It's big enough to have berries. For now I'm going to leave it there. We managed to clear some of the other brush from around it, so I think it will do better. I discovered that two other trees in my yard are mulberry of a decent size. I hope to make jam.

That above was written a few days ago. Today I cut back the spirea  and the final forsythia. I'll try to get up before and after pictures soon.


Friday 30 May 2014

Michelle makes a shawl

This is a simple garter stitch shawl. Formed by starting with 5 stitches. Stitch markers were placed either side of the center stitch. Increases were made by yarn overs on either side of the center stitch and just inside the edge stitches. The yarn overs were closed by knitting through the back of the stitch on the next row. I spent some time looking for a simple-ish shawl to make with this yarn. I ran across the pattern for the simple garter stitch shawl (http://www.ravelry.com/patterns/library/very-simple-garter-stitch-shawl) and thought that that would be boring the best to show off the color of the yarn. I'm very proud of how the yarn turned out. I found this website (http://theworkisgettingtome.blogspot.ca/2011/09/how-to-dye-long-gradient-with-wool-and.html) and loved the idea of being able to do this gradient. She had done a single color. I thought I would try a second color and see if I could get the one to blend into the other. A problem that I ran into is that the Fisherman's wool skeins are larger than the Paton's used by the person in this blog. I balled up the wool and dyed the purple first and rinsed it as she did in her blog. I then let it dry and balled it again with the purple on the inside. I used more Kool Aid for the red and ended up basting the ball to see if I could get the color in further. It worked. I rinsed and dried it then redid the purple to try to close the white gap in the middle. I think it worked.
Because of how it gets balled up, you get a sort of speckled effect. There are areas where the dye can get in further than other areas. In the center of the shawl, you can see where there are intermingling speckles of the two colors. Overall I really like the effect. This makes a normal sized shawl. I'd like it to be bigger, but I'm not sure how yet. I could get more wool, dye it red and add to the bottom. I could get more wool and dye it with a gradient and have it go back to purple. I could add a different color at the bottom. I just like larger shawls.

Monday 26 May 2014

Michelle makes pickles

I tried making pickles last fall. I followed the recipe in the Ball book for brined dill pickles. I left them brining in the basement for a few weeks and when I pulled them out, the girls and Greg loved them. Then I canned them. It completely changed the flavor and texture of the pickles. We were all sad. The girls (and Greg) both love pickles, so I had to try again. Today I made 3 kinds of pickles (brined dill, kosher dill and bread and butter), but only one jar each. I tried the brined dill pickles again, but rather than the 10 pounds of cucumbers the recipe called for, I tried it with about 1 pound. I tried dividing out the recipe to add a tenth of each item. I used 2X about 3/4 tablespoon of the Ball Mixed Pickling Spice (one for the top and one for the bottom). I added 6 cloves of garlic, which is what the original recipe called for. What? We love garlic. The jar only held about a cup and a quarter of liquid after adding the cucumbers, so I mixed a cup of water with a hearty splash of vinegar and 2.5 tablespoons of salt. I also used some wilted dill. I bought it last weekend to make pickles, but didn't get around to making them for a couple days (seriously, only 2 days) and my cucumbers went off. The dill wilted, but otherwise looked OK, so I used it anyway.
The other two batches were even easier. They were still roughly a pound of cucumbers, but I had bought pouches of spices to add. They called for 3.5 pounds of cucumbers, so I just used half of it and halved the water and vinegar. The pouches say to heat the water, vinegar and pouch (plus sugar for the bread and butter) to boiling then pour over the cucumbers in a bowl and let cool then put in the jars. You can refrigerate them at this point or process them for sealed jars.
These are two of the batches cooling, the Kosher dill on the left and the bread and butter on the right.
Left to right, brining, bread and butter and kosher dill. The goal was to get pickles we can eat soon, so I just put them in jars to put in the fridge. We like the more crisp pickles, so less processing is good. If they turn out OK, I can make some every few weeks and have a more continuous supply. Now I just need to fight the urge to try them for at least a couple weeks.

Sunday 25 May 2014

Birdie

Yesterday, I went with Janette and her friend Sara to make glass birds at the Toledo Museum of Art. We had taken similar workshops and made pumpkins, icicles and flowers. Each used different techniques to shape the glass. I didn't know how we would make the birds, but it turns out that we didn't really use any different techniques.
The people teaching the course did a demo bird to show us what to expect and then they took us one at a time through making our own. First they used the rod to dip a bit of glass out of the furnace. They brought it to us where we dipped it in up to two colors. I chose red and orange. We let it sag into the one color then flipped it into the other. Then it was into the furnace to melt the colors into the glass.
The next step was to twist up the colors some. They brought the rod to us and we gripped the end of the glass with forceps while they turned the rod. They let it cool a bit so they could get another layer of clear glass on it.
We used a shaped wood paddle to shape the glass a bit, then used another tool to make an indent for the neck and where it will be removed from the rod. This gives it a body and head. Then it's back into the furnace so it can be shaped more as the glass cools quickly enough that it is hard to shape without reheating. The next step is to use the forceps to grab a bit on the head to form the beak and pull it out and then flatten it.
After a bit more reheating it is a similar move for the tail.
Then it's a bird on a rod.
They put the bird into something to hold it so we can remove the rod. They use diamond cutters to make the attachment small then they hold it while you rap the rod with the handle of a butter knife. A torch melts the glass enough that we can use a graphite paddle to flatten the bottom so it can sit.
The birdie. It had to be put in an oven to cool slowly so I don't actually have the bird yet. Because it was hot while working on it, we didn't get a good idea of how the colors will turn out. Shawl update. I got into the pink, so I'm over half way. I'm having trouble getting the picture transferred at the moment, but I'll update about the shawl again.

Can't. Stop. Planting

I broke down today and bought some more strawberries. This gives me a third kind. Carol gave me some store bought everbearing strawberries and some wild ones. The ones I bought today are "June bearing" and had small strawberries already. I put them on the porch while we went out for family stuff. When we got back, something had eaten some of the strawberries, or at least parts of them. I suspect Chipmunks. It didn't really look like a bird had gotten to it. If it becomes a problem, I'll try bird netting, but if it is chipmunks (which we have lots of), the netting won't help.
I also bought another oregano to put in my herb garden. Oh, I don't think I updated about my herb garden. I think the last I posted, I had put down mulch and had my herbs in pots. The more I thought about it, the more I wanted it to be a proper herb garden. You know, with the plants in the ground. I asked Greg if he would be mad if the mint spread into the grass and he said no, so I did it. I put the herbs mostly in the back along the paving stones by the garage and the oregano and basil in the front. I broke down today and bought a second oregano. Basil and oregano are the herbs we use the most. I seem to have trouble with basil. I've killed one basil already this year and a second looks really sad. The third I put right into the garden by the tomatoes. There are websites out there about "companion planting" and what plants go well with others. It seems like basil and tomatoes go well together and not just in meals. I also put chive by the tomatoes and dill in with the lettuce. That was before I put the rest of the herbs into the ground so, depending on how things go, I may move some of those herbs down to the herb garden.
I had help planting the herbs. I did buy basil, dill, sage and leek seeds today. I thought that at least this way of killing basil is cheaper. I managed to shoehorn the leeks into the garden. Another issue I've been thinking about is trellises for my peas, beans and cucumbers. I saw what Carol has for trellises and like the idea, but I don't know that I need to do that, at least for this year. She used metal electrical conduit to make a frame over rebar in the ground with a netting with big openings attached to it. Looking at where my beans and peas are, I could just attach the netting to the PVC that I put in for frost covers. The beans and peas are mostly in line with those. I just need the netting and something to put in for the cucumbers. I think I'll just get more tomato cages for them for this year. That is an inexpensive way to solve it for this year. I probably only need to get one cage as one of the tomatoes could be put on the netting I put in.

Friday 23 May 2014

A busy day and a shawl

Today was a busy day. It started out with Field Day at Valerie's school. I volunteered to help out. My station was the hurdle station. The kids came through one class at a time and we had them run in pairs. They could go over, under or zig-zag around them. It was entertaining. Unfortunately, Valerie tripped over the starting cone and was so upset about it that she could hardly finish. I do think she had a good time at the rest of the stations. I did get to see her in the sack race (at a distance) at the tug of war (her group won 4), dribbling basketballs (difficult for most of them in Kindergarten) and a game where they were tossing balls over a high rope. It appeared that any balls that were caught were taken out of play until they were gone. Afterward, we handed out popsicles to Valerie's class. It was a good morning.
I went to Panera for lunch then took some cucumber seedlings and a bean seedling to Carol's for an upcoming plant swap that I won't be able to go to. She gave me 6 wild strawberry plants and 8 non-wild strawberry plants. We have an area in our back yard that used to be filled with what may be forsythia. It was a large area that was covered. When my parents were here a while back, Dad cut them back quite a bit and we discovered that there are only 4 main shrubs, but where the branches touched the ground, they rooted. That left an area that was about 4 feet wide and probably 12 feet long that was bare ground. We put grass seed in it last weekend, but then Carol mentioned strawberries and I thought that that area would be a great place for a strawberry patch. When I got home with the plants, I finished clipping back the shrubs so that they are no more than hip high and I pulled out what I found of the secondary plants. I had to rake out the area as well. That opened up that area even more and I would love it if the strawberries took over that area. My garden is really looking like a garden
Tomatoes, basil, beans, onions and peas
Tomatoes, Cucumbers, basil and carrots
Lettuce, the taller planted as plants, the shorter as seeds), broccoli, sage (in the pot) and green onions.
The peas again, bell peppers, broccoli, carrots, green onions, onions. After clearing out the forsythia and planting the strawberries, I walked to go get Valerie. I decided I was too worn out to also walk to get Cordelia, so I took the van. I spent a couple hours in the evening cutting up the pile of stuff I cut off of the forsythia and out of the herb garden. The city empties our bins on Friday morning. My two compost bins are now full again. Soon it will be time to cut back our lilacs (along with some other shrubs in the yard), so I think I'll be filling the bins most weeks for the summer. There is so much to do in our yard yet, but I'm still mostly enjoying it. I sort of wish I had more garden space, but I need to know I'll continue to be interested through the course of the summer. I was pulling some thistles from the thistle garden earlier in the week and discovered that the poison ivy in there is more widespread than I originally thought. It is time to do something about it. I have recommendations to use Roundup to get rid of it. On the half with the poison ivy, there is a half dead evergreen shrub and a shrub with thorns on it, both of which I don't care if it kills them. That goes for the ground cover in there as well.
I'm working on knitting a shawl. Following this website: http://theworkisgettingtome.blogspot.ca/2011/09/how-to-dye-long-gradient-with-wool-and.html I dyed a skein of Fisherman's wool with Kool Aid. My plan was to dye with purple then, rather than leaving it fade to white, dye the other end with red and have the two colors meet in the middle. The thing with the Fisherman's wool is that the skeins are quite large. I ended up with it being whiter in the middle than I had planned, but the specks of pink and purple do overlap in the middle a bit. I'm very happy with how it turned out. I'm making a plain garter stitch shawl. I'm loving how the color is turning out. For a bit I thought I might want to do something more interesting than garter stitch, but this will show off the color best. It inspired someone to try it with sock yarn already. Greg even looked suitably impressed when I showed it to him. I've done a bit more than what's shown in this picture. The rows are getting quite long already and I'm in the middle of the skein.

Sunday 18 May 2014

A busy weekend

Friday I spent the morning rearranging the kitchen. I didn't get nearly as much accomplished as I had hoped, but it looks better. I finished the scarf/hood combo that I was working on. It just needs buttons. I'll have to get pictures.
I started mulching the flower garden this weekend. I need to get that finished. What I did start and finish this weekend was the little weed garden beside the garage. It had lots of garlic mustard and some small trees in it. When I was clearing out some of the garlic mustard last weekend, I found a few pretty ferns. I left those there.
When I took this picture, I had already cut down the small trees that were in this area. I was able to remove some of the roots of most of the trees.
I still need to cut up the trees to put them in the compost, but I don't really have a place to put them. I finished cutting up some branches I had cut out a couple weeks ago and put them in the compost bins for the city. I pulled a bunch (like almost a wheel barrow full) of thistle out of the thistle garden yesterday. I found a few pavers in the middle of the bed. I am far from being finished with the pulling of the thistle. It may be a losing battle, but I'm hoping to reduce the amount of thistle in there. The bed has many young trees (that I'll probably want to remove) and some pretty ground cover. We discovered that the two bushes that are in it close to the road aren't actually lilacs. I really should figure out what they are. We want to trim them down some. I did discover that there is poison ivy in that bed as well. I think it is all on one end of it. On that end is also a half dead evergreen shrub of some sorts and a bush that looks good but is full of thorns. That bed is mostly on the neighboring lot, which I need to remember, so I really can't do anything major to it.