I made another journal cover last night for my other daughter and thought I'd share how I made this in a blog post.
The "ink" I use is leather dye. I found the black at Joann and bought green and blue at Tandy Leather. They turned out to be the same brand of leather dye. The blue dye is in a resealable bag because it is open and the seal on the bottle isn't good once opened. It leaked, thankfully into a plastic bag that I was storing them in. You can see some of the dye on the label of the green dye.
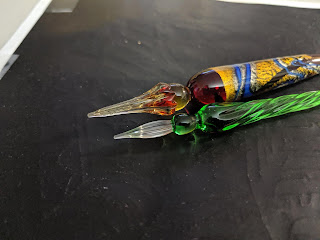
Rather than using a cloth to rub the dye into the leather, I use some glass dip pens that I bought in Venice. I did see that they are available on Amazon, so they can probably be found more locally.
I have two sizes of dip pens. Both are glass, but one has a finer tip than the other. They have grooves that run up the length of the tip to hold ink. Regular calligraphy type dip pen with a metal nib can probably be used, but then you have to be careful which direction you draw as those nibs will create splats if you push them the wrong way. These glass pens can write in any direction.
I use carbon paper to trace the design onto the leather. I use these pens (without ink) for that part as well. I tape the paper over the carbon paper and onto the leather. On this particular leather, the mark left by the tape rubbed off easily.
Then it's time to ink! Here I show one of the pens after it was dipped into the leather dye. I leave the dye in the bottle it came in and just dip the pen in. I touch the pen to the lip of the bottle to get off any big drips.
In the background of the picture is a test piece of leather. I transferred part of the design onto it to make sure this plan would work.
On the Hufflepuff piece at the top of the post, I used black ink from Joann. For the Ravenclaw cover, I used the blue. It seems like they should behave the same because they're the same brand, but I had more trouble with the blue dye than with the black. There must be some property of the color that affected how the ink ran from the pen.
With the black ink, I could get finer lines with the smaller pen. With the blue dye, more of the dye wanted to come off of the pen when it was dipped and first applied to the leather. What worked in the end was doing a stroke or two in the Ravenclaw letters, where I knew I was going to color it in (or on a scrap piece) so that I could get thin lines with less dye on the pen. I ended up with lines that were thicker than I wanted them to be toward the bottom of the design. Only the small pen was used in the Ravenclaw piece, where the larger pen was used for the thicker lines in the Hufflepuff design.
The design is on the right half of the rectangle of leather. After this point, I punch holes in the top and bottom of the middle through which I'll feed some narrow elastic that will hold the notebook. These are sized to fit a composition notebook so that my girls can replace them easily.
Below is the first cover I did. I used scrap leather that my husband had kicking around, so I had to piece it. I also wanted to be able to keep it shut, so I added a pen loop and flap. If the girls want that on theirs, I can add them. This journal cover has held up well, but it was a different leather. The newer ones seem a bit smudgy, so I ordered some sealant to put on them.


No comments:
Post a Comment