Thursday 30 January 2014

Spinning

but first... two pictures of the pantry with stuff in it.
I was very happy to be able to get stuff into the pantry and off of the basement floor. You may notice a lack of canned items. There is a narrow shelving unit right at the bottom of the stairs in the basement that looks like it was just made to hold cans.
It had a door on it, but the door scraped on the floor even before we covered it. I'll have to take an inch or so off of the bottom if I want to use it. It isn't a high priority. The funny thing is that we didn't even know that the unit was there until after we moved in. There was a tall panel of wood that I guess we just figured was some sort of wall or something until I noticed it had a handle. I've thought about painting it, but that isn't as pressing as painting the pantry was. Starting on January 22nd and ending yesterday I spent my crafting time spinning up some roving. I bought this at the Fiber Expo this fall and had originally wanted to spin it up and ply it so that the plies were different colors and then knit it into something fantastic. I've been eyeing some of the yarn that the Yarn Harlot has spun and was aiming for something like what she'd done here: http://www.yarnharlot.ca/blog/archives/2013/03/14/bad_breaking.html Then I decided to try to keep the colors together in the plies so I would just have a variegated yarn. Looking back, I kind of wish I would have stuck with my original idea. I had two braids from Happy Fuzzy Yarn in purple and yellow. They are 4 oz each. I guess they called the colorway "enchanted". You can see it here (second row from the bottom on the right), except it isn't BFL but a mixed breed wool roving. http://happyfuzzyyarn.com/shop/product.php?productid=17614&cat=0&featured=Y The first braid went quite well. It was very long and doubled back on itself, but I could see that it was repetitive enough to just break the length in half and the two halves should give me something similar. Toward the end of plying the first bobbin (I could only fit about 2 oz on each bobbin) it got a bit off, but I just stopped and took some of the yarn off of one so they were in the same spot. One bobbin ended before the other, but I was able to add that bit I took out and ended up with just this left over:
I call it a win :) I guess this is the only picture I have of the first plied yarn (and a single from the second)
You can see the mixing of the colors on the one on the left. Here are the bobbins of singles from the second braid along with the second plied bobbin. I couldn't find my niddy noddy so I used my inkle loom to wind out the yarn to measure length. The first bobbin of plied yarn is on it. Again you can see the color mixing.
The second braid didn't go as well. I didn't take any pictures of it plied on the bobbins, but a few times I took a segment of yarn out of one of the singles to match the colors up. I ended up giving up trying to match the colors in the end. I had 8 oz of roving total. I ended up with 287 yards (230 if I leave out the badly color mixed one, which I probably won't) of 2 ply yarn. If I wrapped it right, I ended up with 9 wraps per inch, which appears to be a worsted yarn. Now to figure out what to do with it.

Saturday 25 January 2014

Pantry

OK, this isn't going to be a post about me making something, but it is about a project that I've been working on over the past week. We bought the house we live in this past summer. There have been a few minor changes that we've made to it, the most exciting for me was to convert the addition to the basement into my craft room. Of lesser importance was painting the pantry. I love that the house has a pantry in the basement built under the stairs. It was plain wood, which wasn't an issue, but the walls of the basement are cinder block and that was one of the areas where the walls weren't painted, so they were shedding a bit onto the shelves. I really wanted to get the wall painted before using the pantry, but ended up using it some (very unorganized). I have a goal of getting the basement better organized (it's been a catch all since we put the new floor in) and it didn't really make sense to get the pantry properly organized and then paint it in a couple months. Here's what it looked like originally:
I used some of the leftover primer that I used in my craft room. There wasn't a whole lot left, but I made the wall the priority before doing any of the shelves, which could have taken any paint. There was quite a collection of paint cans left in the basement from the previous owners. Our house has some odd colors in some of the rooms, but there were a few cans of white. Between the primer and one can of paint I found, I made it this far:
So I had covered much of the area, but it definitely needed a second coat. I managed to get a second coat on some of it. I tried a couple other cans of white, but they were watery and chunky. I managed to get one mixed enough to be smoother, but it didn't really want to stick to the wood, so I gave up on that paint. A little more searching led to another can of whitish paint. It's a bit more blue than I was aiming for, but I wasn't being really picky as to what it looked like. I finished a first coat on the few areas that I couldn't get to last weekend and was going to be ok with the pantry being 2 different colors, but I had enough to recoat the whole thing. Here's how it looks:
I didn't paint any of the outside. I was really tired of painting this by the time I finished the first day. It's a bit bluer than it looks in the pictures. I'm mostly just happy to be finished with it. My husband will be away in the evenings this week, so I won't be able to work in the basement in the evenings as I wouldn't be able to hear the girls. It should be a week of crafting after the girls go to bed. It will be good :) I've been working on my sweater and have done a bit of spinning that I will try to post about soon.

Thursday 16 January 2014

Sweater progress

It was knit night last night. I impressed myself with the progress I made on my sweater while we were there. This is the back of the sweater. When I went to knit night, I was only one row out of the ribbing. Here's where it was after knit night. For an idea of size. the ribbing is about 4 inches long.

Monday 13 January 2014

Twist cardigan

Saturday was a busy day and yesterday I didn't feel like crafting in the evening (usually a sign that I'm overtired), so I don't have much to report. I cast on this sweater...twice: http://www.ravelry.com/patterns/library/twist I'm doing it as part of a knit a long (KAL) and because I love making sweaters. I've made 4 so far (3 for me and one for my daughter) and will try to post on them later. This cardigan has what I'm looking for in a knitted project. Some sort of design to make the knitting not totally boring, but not so much cabling where I can't knit it without looking at the pattern every 2 minutes. I'm using Berroco Ultra Alpaca in a gold-ish color. I guess on their website, it would be "dijon". I'm a bit nervous about how a sweater that color will look on me, but I'm willing to give it a try. I say that I cast it on twice because originally I cast on with the main needle size and had missed the "using smaller needles" bit. I managed to get close to gauge with a size 7 needle. I originally cast on with those and thankfully only got about an inch into the ribbing on the back before noticing that I was using the wrong needles (not that it would have been horrible if I hadn't noticed...I think). I've only done about 3 rows with the smaller needles. I'm making the 46 inch bust size as I got 19.5 stitches for 4 inches rather than 19 and I need about a 44 inch bust size. The next smaller in the pattern was a 42, so I figure that 46 should be the best option and turn out about right. I don't want to try larger needles because I like the fabric I got in my swatch and think that the larger needles would make it a bit holey.

Friday 3 January 2014

Anglo-Saxon rings

A few months ago, a friend was tagged in a photo of a ring that they had made. With all this wire, I decided that I needed to try to make one. I fail.
I didn't cut the wire long enough. It's supposed to wrap around the band on each side a couple times. Oops.
I've trimmed the wire so it wouldn't snag, but in my playing around I scratched part of the spiral, so it isn't as smooth as it should be. Here is a link to a tutorial for the rings from a friend of mine. http://www.ellipsis.cx/~liana/sca/rings/ring-tutorial.html My 5 year old asked for a ring, so I made her a small one:
She likes it and has misplaced it at least twice already. I was going to try another ring for me but we have sickness in our family and spent the evening taking care of daughters instead. I will try another soon.

Thursday 2 January 2014

Turritella jasper bracelet

Welcome to my new blog! I do a variety of crafts, mostly fiber related, and have tried before to have a blog where I kept track of what I've done. I've recently gotten into jewelry making and find myself with a little more time to craft so I thought I'd try for a craft blog again. Here's my most recent project. I found the idea in this book that I found at JoAnn Fabrics.
This book really nails the style of jewelry I find myself drawn to. I've made something similar to the bracelet on the lower left and will have to post about it later. I've now made a second bracelet based on one in the book. Since it's my most recent project, I'll write about that first. The original bracelet had similar spirals of wire, but instead of a bead in the middle, they wrapped the two pieces together with bead laden wire. I liked the spirals, but wasn't fond of the beads. I bought these turritella jasper (agate) which contain fossils in it at a local store. I didn't have a plan for the beads when I bought them. I just really loved how they look. You'll find that I'm really a fan of stones in my jewelry as opposed to glass beads. I thought I could substitute these beads for the wire wrapped section shown in the book. The beads have two holes through them. I put one spiral through each hole. It mostly worked. The beads ended up further apart than I had visualized.
The first problem I ran into was getting the spirals even. I suspect that will be something that comes with practice. The second is that the spirals kept wanting to turn in the beads. I added small jump rings between adjacent spirals. That seemed to make them better while not taking away from the design. They still turned a bit, but I don't think that would be a problem The original bracelet had rather largeish jump rings between the design units so that's what I tried first, but they kind of took over and they stuck out horribly when I put the bracelet on my wrist, so I tried smaller ones. I also curved the spirals that run through the beads a bit to fit around my wrist better and it definitely helped.
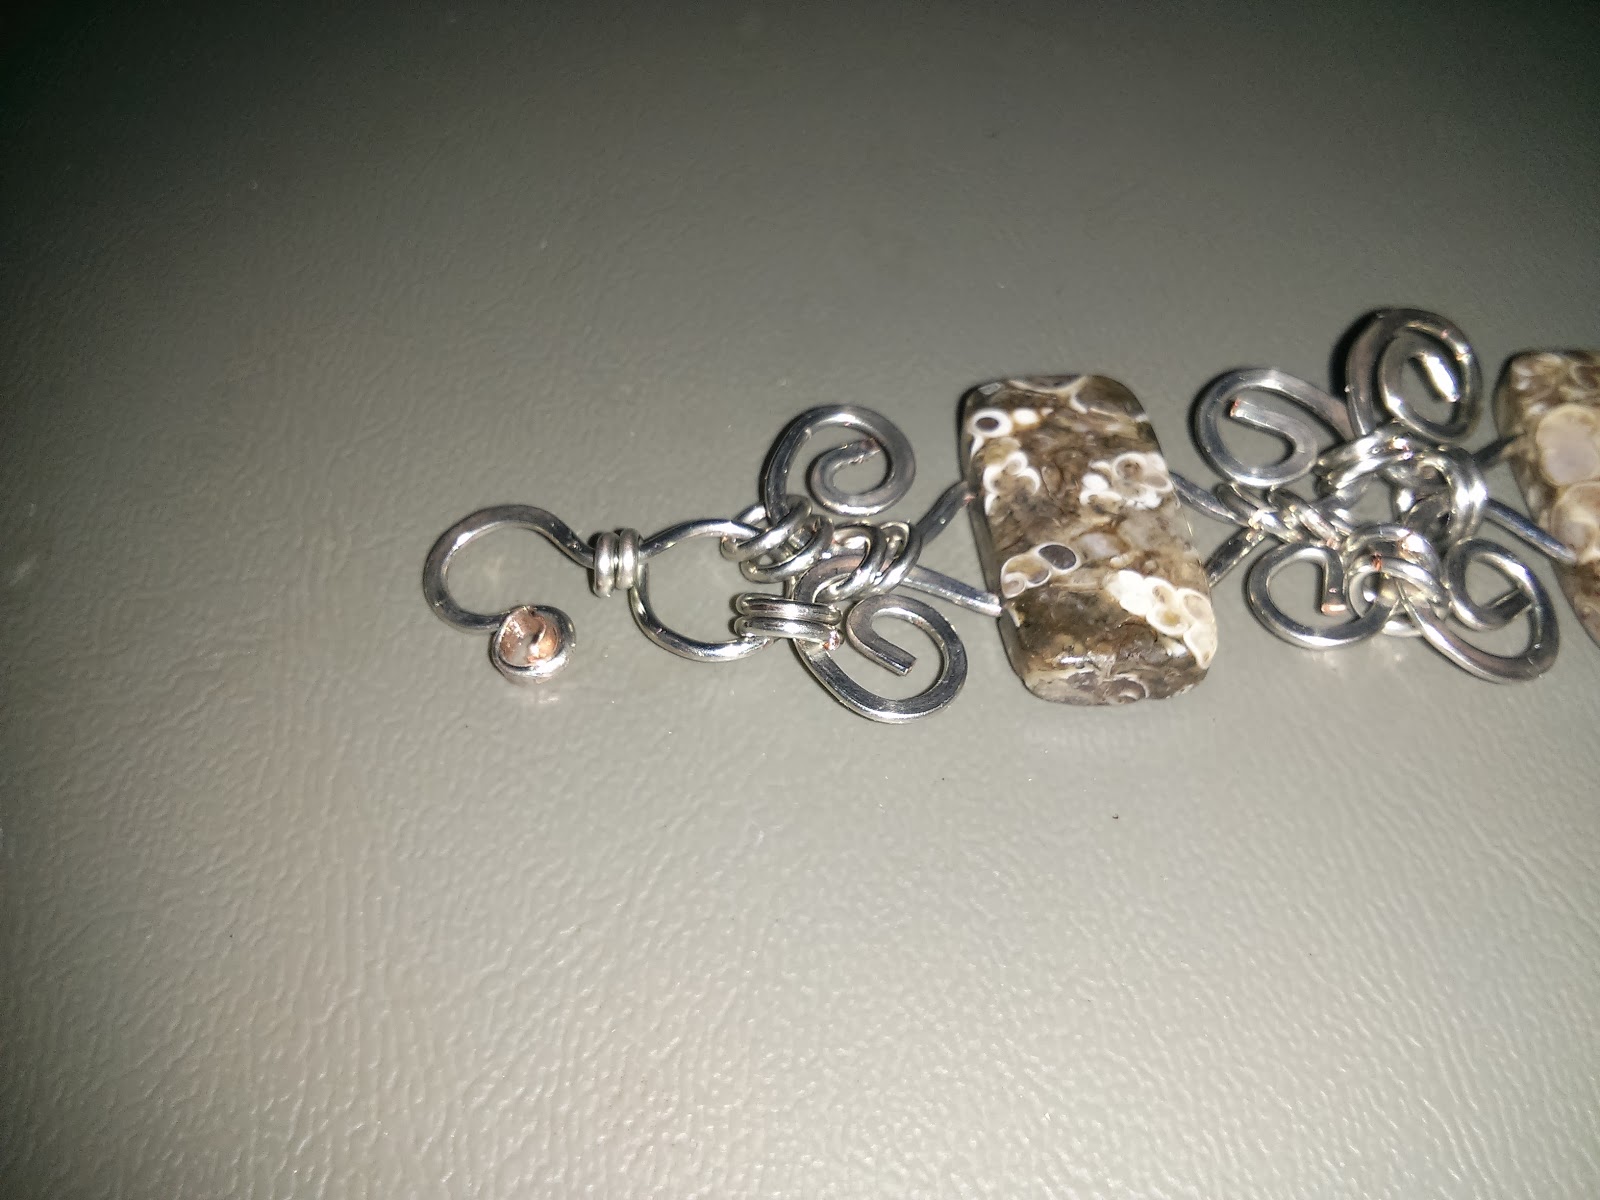
Here's a close up of the jump ring arrangement:
After that, I wasn't sure how to add a clasp. With this number of bead units, I didn't have all that much room to spare, so I just added small jump rings to the end spirals and added a larger jump ring on one end and made a hook on the other. I think it turned out to be a very good length.
I have more of these beads. I will try something a little different the next time. I'd like to try again with the spirals, but it still needs to have space in the spirals for the jump rings, so I'm not sure it would work.