Sunday 23 June 2019

Decorating journal covers

I had a leatherworker recently ask me how I put designs on this journal cover for my daughter.


I made another journal cover last night for my other daughter and thought I'd share how I made this in a blog post.

The "ink" I use is leather dye. I found the black at Joann and bought green and blue at Tandy Leather. They turned out to be the same brand of leather dye. The blue dye is in a resealable bag because it is open and the seal on the bottle isn't good once opened. It leaked, thankfully into a plastic bag that I was storing them in. You can see some of the dye on the label of the green dye.


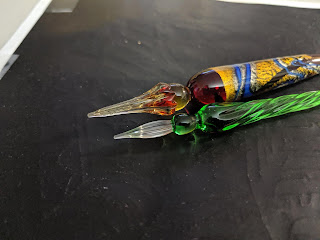
Rather than using a cloth to rub the dye into the leather, I use some glass dip pens that I bought in Venice. I did see that they are available on Amazon, so they can probably be found more locally.


I have two sizes of dip pens. Both are glass, but one has a finer tip than the other. They have grooves that run up the length of the tip to hold ink. Regular calligraphy type dip pen with a metal nib can probably be used, but then you have to be careful which direction you draw as those nibs will create splats if you push them the wrong way. These glass pens can write in any direction.


I use carbon paper to trace the design onto the leather. I use these pens (without ink) for that part as well. I tape the paper over the carbon paper and onto the leather. On this particular leather, the mark left by the tape rubbed off easily.


 The carbon leaves enough color to be able to ink the design. I pressed too hard on the lines behind the raven. They don't need to be that dark.


Then it's time to ink! Here I show one of the pens after it was dipped into the leather dye. I leave the dye in the bottle it came in and just dip the pen in. I touch the pen to the lip of the bottle to get off any big drips. 
In the background of the picture is a test piece of leather. I transferred part of the design onto it to make sure this plan would work.


On the Hufflepuff piece at the top of the post, I used black ink from Joann.  For the Ravenclaw cover, I used the blue. It seems like they should behave the same because they're the same brand, but I had more trouble with the blue dye than with the black. There must be some property of the color that affected how the ink ran from the pen. 
With the black ink, I could get finer lines with the smaller pen. With the blue dye, more of the dye wanted to come off of the pen when it was dipped and first applied to the leather. What worked in the end was doing a stroke or two in the Ravenclaw letters, where I knew I was going to color it in (or on a scrap piece) so that I could get thin lines with less dye on the pen. I ended up with lines that were thicker than I wanted them to be toward the bottom of the design. Only the small pen was used in the Ravenclaw piece, where the larger pen was used for the thicker lines in the Hufflepuff design.


The design is on the right half of the rectangle of leather. After this point, I punch holes in the top and bottom of the middle through which I'll feed some narrow elastic that will hold the notebook. These are sized to fit a composition notebook so that my girls can replace them easily.


Below is the first cover I did. I used scrap leather that my husband had kicking around, so I had to piece it. I also wanted to be able to keep it shut, so I added a pen loop and flap. If the girls want that on theirs, I can add them. This journal cover has held up well, but it was a different leather. The newer ones seem a bit smudgy, so I ordered some sealant to put on them.


Wednesday 24 October 2018

Halloween costume element

I was asked by a friend to help her with her costume. She was to be Mrs. Universe...as in the universe, not a beauty contestant. She had clothes with images of the cosmos: stars, nebulae. She had items with a math theme and other themes, because the universe encompasses everything.
The thing she asked my help with was a head piece. She wanted the atomic symbol in metal to attach to a headband.


The atomic symbol shows three elipses, representing electron paths around a circle representing the nucleus of the atom. Like this (not that atoms really look like this):


Sure. I can help with that...maybe.
I had some 12 gauge aluminum wire. Soft enough to bend into shape, but strong enough to hold its shape for this purpose. It was also a good visual thickness for the size symbol we were making.

We printed out the symbol in the size she wanted. H (my friend) then was able to shape loops of the aluminum to fit to the loops in the image. I didn't take many pictures of the process, but here are the loops sitting on the image.


The image at the top doesn't have electrons on the elipses, but some images do show them, so we decided to add beads for the electrons.

I didn't have a good option for gluing metal today, so we used hot glue. It would have been better to use a soldering iron, but I didn't have any solder to use and wasn't sure if aluminum could be soldered or if it melts too easily. That's something I don't know much about, so I should research it.  I also thought, after we were finished, that I could have attached the rings together with a finer gauge wire. H correctly pointed out that that might be more difficult to keep them aligned right.

The beads we used are ones I've had laying around. I think I bought them from someone who was downsizing and bought them in a batch with other kinds of beads. They have relatively large holes, so they were good for this project. H thought they looked cool, so we went with it.
Here's a picture of what I sent H home with. The disk in the center is for stamping, but it was the right size for the nucleus. It would have been cool to have another large bead or something fancier for the nucleus, but we were working with limited time.


I didn't get a great picture before sending it off. The shadows make this a bit confusing, but H said she'd get me a picture of it on the headband.

Monday 1 October 2018

Chrysalis' winter home

In my last post, I chronicled the egg and caterpillar stages of Eagle, our Eastern Tiger Swallowtail. At the end I had a chrysalis from which a butterfly wouldn't emerge until spring.
What to do with them?!
I knew we couldn't keep them inside. The warmth and artificially lengthened days (hey we use lights in our house...you know, to see) would likely mean that they would emerge too early to be able to find food in the wild. I took on responsibility for this life when I brought their egg into the house, so I had to figure out a way to put them outside and be protected. I've seen posts where they put chrysalises in an unheated 3 season room, but I don't have that option.

I had three important considerations.
1. Keep out predators like mice. This was the biggest concern as I know we have mice around here. I've seen them in our garage, so I didn't want to just set the container in the garage.
2, Keep out artificial light at night since that would make them think the days are longer than they really are. We have a light with a photosensor that turns on when it gets dark outside, so I'd have to be careful where I put it.
3. Correct humidity. They need to not dry out, but I've read that outdoor humidity is fine, but inside the house can be too dry since heating the air tends to dry it. This basically meant that the container needed to be open to the air. I did have to think about keeping out rain and snow, especially since the chrysalis was so close to the bottom of the stick. I didn't want to drown them.

This is what I came up with.

My parents gave me this coffee can with a handle for berry picking. it's metal, so it's unlikely that mice will chew through it.  It held 3 pounds of coffee, so it's a decent size.

I didn't want to have the chrysalis right next to cold metal, so I cut out a circle of  cardboard for the bottom and a rectangle of cardboard to line the side. I just used corrugated cardboard from a box that we had received a delivery in.

I thought this would work well enough, but I had to come up with some sort of lid. I wanted it to be rather open to the air, but needed to keep out mice.
I had some hardware cloth left over from a previous project, so I thought I could use that to keep out the mice.
First, I cut out a couple squares of hardware cloth and bent the corners over the edge. This showed me where I would need to tie the lid down. I drilled some holes in the can in pairs and fed twist ties through the holes. The label came loose when I did the drilling, so I pulled it off. It's still the same can.

The twist ties should hold down the lid well enough to keep the mice out. I'm hoping that the little bit of metal in the twist tie (and the location) will prevent them from chewing through it.
Mice can squeeze through holes that seem too small for them, so I turned one layer of the hardware cloth 45 degrees to make smaller holes.
It was time to add Eagle and get them outside. The stick was a bit too long for this container, so I broke a bit off of the top.
Eagle was right at the bottom of this stick, but they're laying at a similar angle to when they made their chrysalis. Blogs I've read seem to indicate that this angle doesn't matter. I could have removed them from the stick, laid them on the bottom of the container and just made sure to have something for them to climb up when they emerge and they'd have been fine. I was still happy that they made their chrysalis on the stick.
Rest well, Eagle. See you in the spring!


Location, location, location.
As I said, we have a light that stays on all night on the front of our garage. We also have this entryway that seems like it would be great shelter from the wind and precipitation. With the opaque container that was only open on the top and the entryway having an opaque section at the top, I think we found a great location.

It gets quite dark in that corner and there was even already a hook there! They should be out of the worst of the wind and I shouldn't have to worry about them ending up in a puddle since they shouldn't get any snow or rain in there. We just need to remember to check on Eagle regularly in the spring. I don't know when to expect them to emerge, but I've read that it's triggered by warmer, longer days.
The location has the added bonus that we walk by here every day, so hopefully we'll check on them regularly.

It's weird to know that we'll have that chrysalis out there all winter, but I keep reminding myself that these butterflies normally overwinter as chrysalises. I'm still nervous about having done something wrong that would lead to them not emerging, but time will tell.


Saturday 29 September 2018

The adventures of Eagle the caterpillar

Two years ago, we were given an Eastern Black Swallowtail egg to raise. This was the start of a fascinating summer hobby for myself and my daughters. Last year we raised and released 3 Monarch butterflies. This year we released 39 Monarchs.

That's not the story I'm telling today though. Today's tale is the story of an Eastern Tiger Swallowtail named Eagle.

While I was outside one day, I saw an Eastern Tiger Swallowtail. I don't normally see many swallowtails around here, so I watched it for a few minutes. It flew up to a tree on the edge of our yard and fluttered by a couple leaves before flying off.
I knew the butterfly wasn't eating as there were no flowers, so I looked at the leaf where it was fluttering and found this:


Huh. That could be an egg. Hello Google my friend. It turns out that eastern tiger swallowtail eggs look just like this and are often found on wild black cherry trees, which Google again helps me ID this tree as. The butterfly hung out by another leaf, but it was too high for me to reach from the ground. By the time I got back with a ladder, I couldn't figure out which leaf it was.

This butterfly in potentia had quite an adventure even before they hatched.
I picked up the leaf at one point to put fresh, wet paper towel around it and the egg fell off of the leaf. I didn't know that was possible. Thankfully it landed on the table and not on the floor. The next day, Thing 2 picked up the leaf that I had set it back on, forgetting that I had said not to touch it because the egg was no longer attached to he leaf, and the egg fell off again. I wasn't in the room to see exactly where she was when this happened. We looked and looked and couldn't find the egg. By this time the egg was starting to turn tan, which was normal, so it blended in quite well with our off white carpet.

The next day, I made one more attempt to find the tiny egg and was able to find it. Whew! I reissued the directions that no one was supposed to touch the container that had that egg in it and hoped for the best.

A couple days later, the egg had changed again and I suspected it was getting close to hatching.


I was right. Later that day, we had an itty bitty caterpillar. Now I was super glad that I found that egg, otherwise this poor caterpillar would have been searching for food on our floor.  Monarch caterpillars will eat their egg shell first thing, but this caterpillar left it uneaten.


The caterpillar usually hung out in the center of the leaf, so I got a bit concerned that they weren't eating, but then little bits of the leaf were disappearing.

About 3 days post hatch (PH) more of the leaf was gone. The egg makes it more apparent that they are growing than without something for reference.  In this next picture, you can see the marking well that earned Eagle their name. My daughters thought it looked like an eagle on their back.

It's shedding time! Unfortunately, this was the only time I noticed that they had shed, even though they must have shed more than once. You can see the shed skin behind Eagle and the bit that covers the head to the left. This is five days PH.
They do move! Eagle usually hung out in the middle of the leaf on a little silk pad they made so we rarely saw them eating. This picture is through the plastic of the enclosure I had them in because I wanted proof that they ate without disturbing them. This is still 5 days PH.

There are many photos with my thumb for size reference. Eagle is getting white legs! I guess you can see them in the above picture as well, but th is was the point that I started trying to get top and side pictures. This is 9 days PH.

Much more white on 10 days PH, but the eagle is still obvious. We also see the first hints of green starting above the head.
Here you can really see how their head is below the "head" with false eyes. The true head is the dark area on the right. When the caterpillar is resting, their head is often tucked under the front of their body so that predators think that they're bigger with that fake head and eyes. The false eyes will be on the thickest part of the body just before the abdominal prolegs they're standing on. The thoracic legs are held close to the body right behind their head in this picture. They're also more green here on day 12 PH.

Eagle is much more green on day 13 PH. So far the eagle is still prominent. Further to the last picture, you can't see their head when looking from above.
In this picture you can also see the silk pad that they hang out on. Hey, if I could lounge around on silk all day, I'd go for it!
Here's a picture from day 14 PH. You can see their head tucked under their body. Their fake eyes are becoming more prominent and the eagle is fading.
I'm a vicious snake! Predators beware! Day 16 PH.
All stretched out on day 17 PH. You can see their thoracic legs. The eagle is almost gone :(
The leaf Eagle made their pad on is starting to close up. For now, they're still hanging out on that leaf. They're getting a yellow stripe across their "neck". 18 days PH
They look angry. I wouldn't mess with them. 18 days PH
How weird. They're not on their leaf. I don't know when they usually ate during the day, but whole leaves were starting to disappear in these later days.


Not too much changed in the last week or so. Wrinkly face at 23 days PH
26 days PH.
I'm watching you...
Or not. Eagle's face is tucked below as usual. Day 30 PH. This is another good look at the silk pad they rest on. The leaf they've been on all this time is really starting to curl up.

More Day 30 PH. Thumb for scale.
Day 33 PH. Wow. Is that Eagle? 
Yes, yes it is. They suddenly turned brown. I had read that this was a sign of imminent chrysalis preparation.

The pattern in the brown is really quite beautiful.

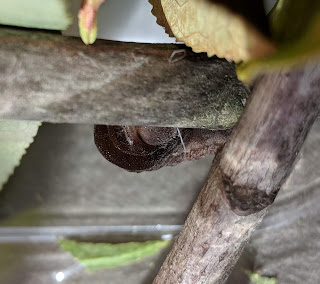
I would have liked to get better pictures of them as they were preparing their chrysalis, but I didn't want to disturb them too much. I was thrilled that they were making their chrysalis on a stick rather than on the enclosure. That would make keeping them for the winter easier to figure out. They are right near the bottom of the stick.  34 days PH

A closer view of Eagle. Here you can see the belt they make for themselves. It's attached to the stick, then they lay back into it so that they're only touching the stick at their back end. Again, no picture of this because I could foresee bad things happening if I tried. Eagle had made it this far. I didn't want to risk any problems that would be due to my meddling. In the picture their back end is hiding under the sticks to the right. The vertical white line is their belt, with their head just to the left of it.

At 35 days PH, Eagle looks quite different. As Thing 1 pointed out, they look like a branch and that helps keep them safe. They still have that belt around them. For these pictures, I pulled the stick out and am holding it more vertically than it was in the enclosure. Considering that the belt is the only thing holding them on, they seem pretty secure. I imagine the little patch near the top end to be a sleeping mask while they rest through the winter. 


Rest well, Eagle. I'd like to say "stay warm", but that's unlikely here in Michigan. I've read that they make a form of antifreeze so that they can make it through the winter. This is the normal way that these butterflies overwinter, so I try not to feel bad about leaving them out there.

My next post will pertain to the winter enclosure that I put Eagle in and the location that will hopefully keep them safe.